Imaging the screenshot on Mac would be a beneficial skill for users who want to exchange information and keep a record of files in the form of images. Whether you want to report errors, share a conversation record of a chat in the form of an image, or even a tutorial to guide someone. So, how to screen on Mac?
To take a screenshot on Mac, you have to press and hold the “Shift + Command + 3 “keys, which will capture the entire screen on your Mac. If you don’t know how to screenshot on Mac of a specific portion, then you have to press” Shift + Command + 4” to capture a specific portion of the screen. You can access the screenshot from the library section of the Photos application.
In order to guide you more clearly, we have written this detailed guide on how to screenshot on Mac by following a few easy methods. We will look into multiple ways of taking screenshots on Mac and how you can access the screenshots on your Mac device.
How to Screenshot on Mac
Here, we have discussed different ways to screenshot on Mac by following a few easy methods. Each of these methods would involve keyboard keys or shortcuts to capture the screen in different ways on a Mac device.
Method #1: Take a Screenshot of the Entire Screen
The first method to take a screenshot on Mac is by capturing the entire screen. To capture the entire screen as it is, simply press and hold the “Shift + Command + 3” keys on your Mac’s keyboard, as shown in the image below.
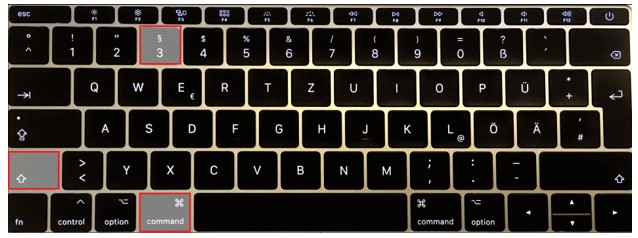
Pressing these 3 keys at the same time will capture your current screen on Mac and save the screenshot as an image on the Desktop. The name of the screenshot would be entitled “Screenshot,” along with the date and time to denote when it was captured.
Method #2: Screenshot a Specific Portion on Screen
Now, if you are not into capturing the entire screen, then you may be wondering how to screenshot on Mac of a specific portion. Then here is how you can do it. Press and Hold “Shift + Command Key + 4” on your Mac’s keyboard until your mouse cursor turns into a crosshair with a + shape.

Now, to capture a specific portion of the screen, click and drag on that specific area to cover it. As you start dragging the area that you want to capture, it will begin to turn transparent highlighter to show which part of the screen you are capturing. Once you have captured the specific part on the screen, the screenshot will be saved automatically for you to access on the Desktop.
Method #3: Screenshot a Specific Windows
Another way to take a screenshot on Mac is of a specific Window. This may seem like more of a tricky part, but its fairly simple to do so. Simultaneously press the “Shift + Command + 4” keys and then press the space key. Now, the crosshair of your cursor icon will change into a camera icon. In order to take a screenshot of a specific Window, click after highlighting that specific Window with your cursor.
Method #4: Screenshot Menu on Mac
If you are using a Mac device with macOS Mojave or later, you can access the entire screenshot menu on your device to capture the screenshot as you wish to do so. The macOS versions before Mojave such as the Macbook 12in m7 do not have this feature, and you may have to rely on the key commands to capture a screenshot.
So, if you are using the macOS Mojave, Catalina, Big Sur, Monterey, Ventura, or Sonoma, simply press the “Command + Shift + 5” keys simultaneously to bring the entire screenshot menu on board. This screenshot menu will apparently look something like this, as shown below.

With this complete screenshot menu on Mac, you will get the following options to capture a screenshot:
- Capture Entire Screen
- Capture Selected Window(s)
- Capture Selected Portion
- Record Entire Screen
- Record Selected Portion.
The advantage of using the screenshot menu is that you also get the option to screen record. In the screenshot menu, you can also find the ‘Options’ menu that allows you to define a space for saving your captured screenshots on Mac.
Method #5: Take a Screenshot of the Touch bar
The new age Mac computers now come with the Touch Bar that makes navigation easier to bring all the relevant shortcuts on board with the keyboard. Hence, it becomes a lot easier for Mac users to quickly access certain options.
Now, if there is something on your Touch Bar that you want to capture and show to others, simply press the following keys simultaneously: “Shift + Command + 6“. This will capture the screenshot of everything that is shown on the Touch Bar screen of your Mac device. Keep in mind that this method is only an application on Mac devices with touch bars. In other cases, pressing these keys simultaneously won’t do anything.
Where Can I Find Screenshots on Mac?
By default, the screenshots taken on Mac are saved on the Desktop with the file name ‘Screenshot’ and the date with the time of capture. The format of the screenshot would be PNG mostly. However, if you are using the screenshot app on Mac, then you can define the location where the screenshots can be saved. The screenshot menu also shows the video output saved on Mac.
Final Words
In this guide on how to take screenshots on Mac, we covered several different methods of capturing screenshots on Mac by following a few easy key shortcuts. With each method, we looked into a different way of capturing the screen on your Mac device. Moreover, we also discussed the Mac Screenshot application that works on Mojave and further on. Hopefully, this guide was helpful, and now you know how to take a screenshot on Mac.