This guide follows Apple Support and the Mac User Guide as published on November 10, 2026, for macOS Ventura 13 and later. We didn’t time backups on a test Mac, so there are no speed figures here, and we don’t name third-party drives or backup apps. No affiliate links. More in our cloud storage and backup guides; see also our editorial policy.
Quick answer
Connect an external drive with at least twice your Mac’s storage, open Apple menu > System Settings > General > Time Machine, click Add Backup Disk, pick the drive and click Set Up Disk. The first backup starts right away. After that, Time Machine backs up on its own and keeps hourly backups for 24 hours, daily ones for a month and weekly ones until the drive fills.
Key takeaways
- Drive size: Apple suggests a backup disk with at least twice your Mac’s storage, used only for Time Machine. A 1 TB Mac ideally gets a 2 TB disk.
- What’s saved: your apps, music, photos, email and documents. Time Machine skips system files and the apps that come with macOS, plus anything you exclude.
- Encryption is a setup choice. If you turn on Encrypt Backup, you’ll need that password to restore, so store it somewhere other than the Mac.
- Two ways to restore: the Time Machine timeline for single files or older versions, and Migration Assistant for a whole account or a new Mac.
- Network backups work to another Mac or an SMB network drive. Apple no longer recommends AirPort Time Capsule, because the AFP protocol it uses isn’t supported in macOS 27 or later.
In this guide
- Set up Time Machine
- What size drive you need
- Back up now and check progress
- What Time Machine backs up
- How often it backs up
- Restore files or old versions
- Restore a whole Mac
- Back up to a network drive
- Exclude folders
- When the backup disk is full
- Time Machine vs iCloud
- If a backup fails or is slow
- FAQ
- Sources
How do I back up my Mac with Time Machine?
Plug in a USB or Thunderbolt drive, then add it as a backup disk in Time Machine settings. Apple’s steps for macOS Ventura 13 or later are below. Your Mac may offer to erase the drive so Time Machine can use it, so copy off anything you need first. Once setup finishes, Time Machine starts backing up straight away and keeps going automatically whenever the drive is connected (Apple Support).
- Connect the external drive to your Mac. If a Time Machine can back up your Mac notice appears, you can click Options > Set Up there instead of steps 2 to 4.
- Choose Apple menu > System Settings, click General in the sidebar, then click Time Machine.
- Click Add Backup Disk (or the Add button if a disk is already set up).
- Select the drive and click Set Up Disk. If a window appears, you can limit how much space backups use and choose whether to encrypt them, then click Done.
- If asked to erase the disk, click Erase or pick a different volume. If asked whether to claim backups made by another Mac, claim them only if you want them added to this Mac’s history.
- If you chose encryption, create the backup password. Apple says you’ll need it to restore files later.
Apple’s Mac User Guide adds two details: Time Machine can’t back up to a disk formatted for Windows (it offers to reformat it, which erases it), and setting up in the evening lets the long first backup run overnight (Mac User Guide). If you’re on macOS Monterey 12 or earlier, the setup screens differ; Apple links version-specific steps from the same guide.
What size drive do I need for Time Machine?
Apple recommends a backup disk with at least twice the storage capacity of your Mac, not twice the space you’ve used. Its example: a Mac with 1 TB of storage should ideally back up to a disk of at least 2 TB. The extra room is what holds older versions; when it runs out, Time Machine deletes the oldest backups. Apple also says to use the disk only for Time Machine (Apple Support).
| Your Mac’s built-in storage | Backup disk of at least (2x) | Separate APFS volume for Time Machine (advanced) |
|---|---|---|
| 256 GB | 512 GB | Time Machine volume of at least 512 GB |
| 512 GB | 1 TB | At least 1 TB |
| 1 TB | 2 TB (Apple’s own example) | At least 2 TB |
| 2 TB | 4 TB | At least 4 TB |
| 4 TB | 8 TB | At least 8 TB |
| 8 TB | 16 TB | At least 16 TB |
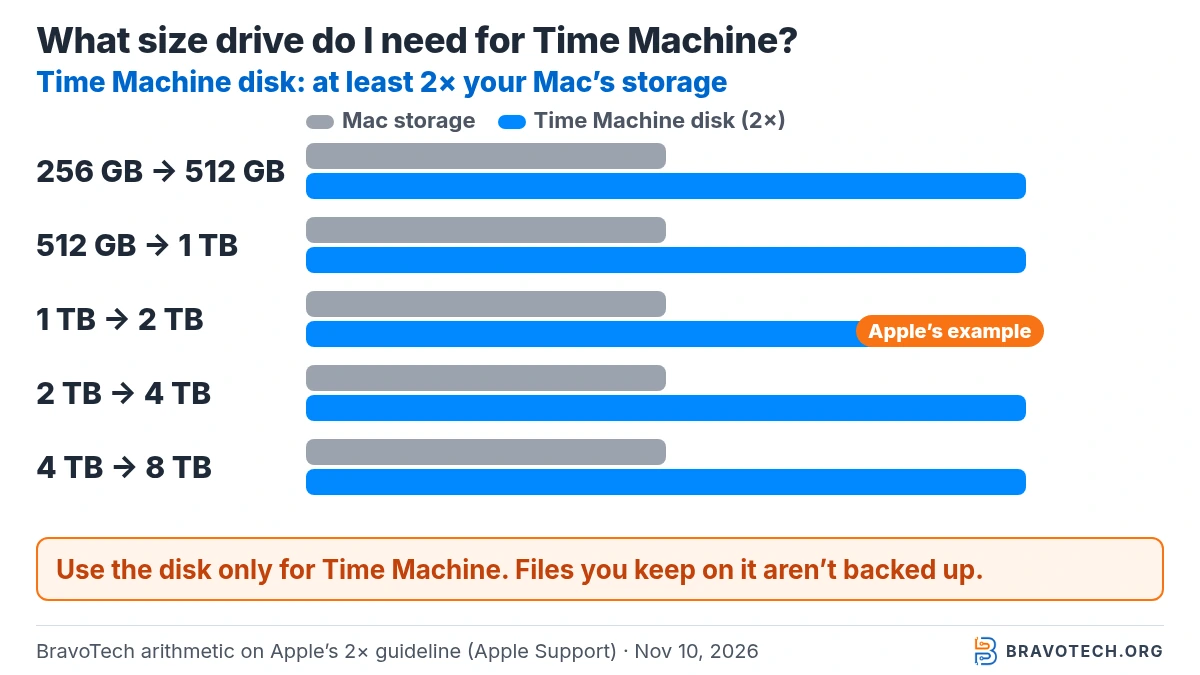
Want to use the same drive for other files too? Apple’s advice for advanced users is to add a separate APFS volume for those files and keep the Time Machine volume at twice your Mac’s capacity. Files you simply drop onto a Time Machine disk aren’t backed up, and they shrink the space left for backups (Mac User Guide).
How do I start a Time Machine backup and check its progress?
Choose Back Up Now from the Time Machine menu in the menu bar, or just wait for the next automatic backup. The same menu shows how far the current backup has got, or the date and time of the last one, and lets you stop or skip a backup. If the icon isn’t there, go to System Settings > Control Center, find Time Machine and choose Show in Menu Bar (Apple Support).
The first backup copies everything, so it can take a long time; you can keep working while it runs. Later backups copy only what changed. Before unplugging the drive, eject it or shut down the Mac; Time Machine picks up its schedule again when you reconnect it (Apple Support).
What does Time Machine back up on a Mac?
Everything on your Mac that wasn’t part of the macOS installation: apps you added, music, photos, email, documents and the rest of your user files. It skips system files and the apps that came with macOS, because you get those back by reinstalling macOS. Anything you add to the exclusion list is skipped too, and the backup disk itself is excluded automatically (Mac User Guide; Mac User Guide).
| Item | In a Time Machine backup? | Source note |
|---|---|---|
| Documents, photos, music, email and other user files | Yes | Apple Support: back up your Mac with Time Machine |
| Apps you installed yourself | Yes | Mac User Guide: files that weren’t part of the macOS installation |
| macOS system files and apps installed with macOS | No | Reinstall macOS, then restore with Migration Assistant |
| Folders or files you exclude | No (still in local snapshots) | Mac User Guide: exclude files |
| Other files stored on the backup disk | No | They also reduce space for backups |
| Files still syncing with a cloud service | Maybe later | Apple Support: Time Machine may wait until syncing completes |
How often does Time Machine back up, and how long does it keep backups?
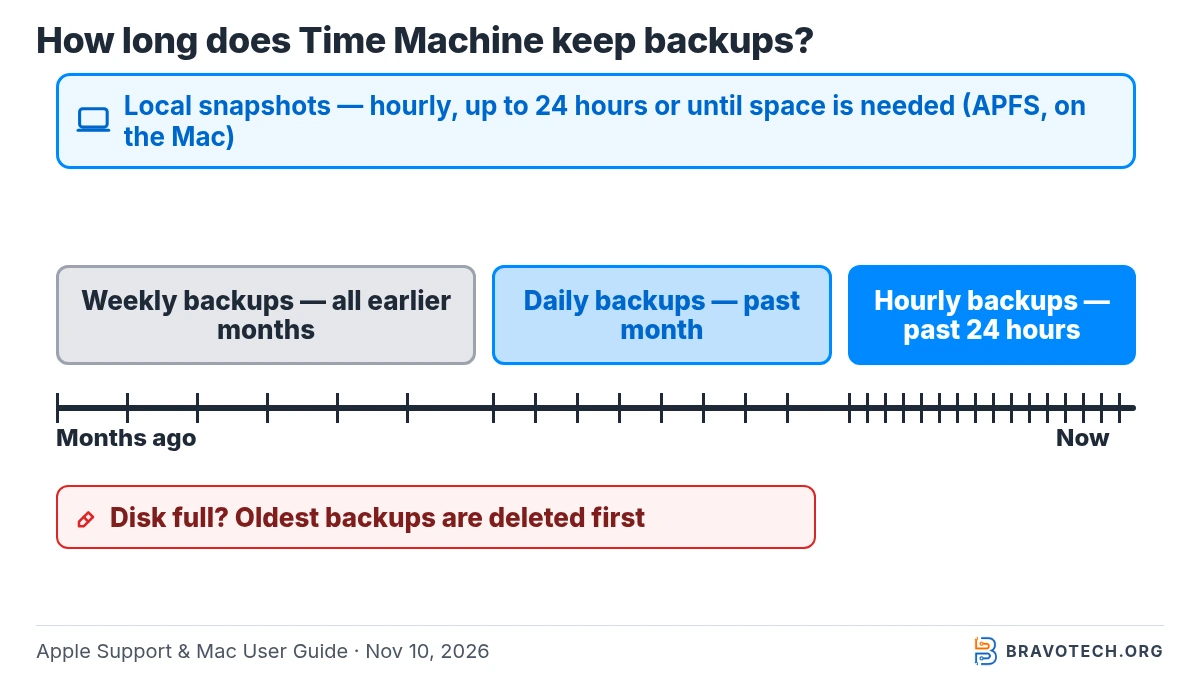
By default Time Machine backs up every hour and keeps hourly backups for the past 24 hours, daily backups for the past month and weekly backups for all earlier months. When the disk fills, the oldest backups are deleted. In macOS Ventura 13 or later you can change the schedule: open Time Machine settings from the menu, click Options and pick a setting from the Back up frequency menu (Apple Support).
On APFS-formatted Macs, Time Machine also keeps local snapshots on the Mac’s own disk. Apple says they’re created hourly and kept for up to 24 hours, or until the space is needed, so you can recover a recent version even with the backup drive unplugged. They live on the same disk as your files, so they’re no replacement for the external backup (Mac User Guide).
How do I restore files from Time Machine?
Open the folder that held the file, open Time Machine from Spotlight, step back through the timeline to a backup that has it, select it and click Restore. Restored items go back to their original location. For a file deleted from the desktop you don’t need to open a window first, and many apps also offer File > Revert To > Browse All Versions for older versions (Mac User Guide).
- Open a Finder window for the folder the item was in, for example Documents.
- Use Spotlight to open Time Machine (it’s in the Other folder). Your Mac may show a message while it connects to the backup disk.
- Use the arrows next to the windows, or the timeline on the right, to go back to the right backup.
- Select the files or folders and click Restore.
How do I restore my whole Mac or move to a new Mac from Time Machine?
Use Migration Assistant and choose to transfer from a Mac, Time Machine backup or startup disk. It can bring back your apps, user accounts, files and settings, on the same Mac or a different one. If the Mac needs macOS reinstalled, for example it starts up to a flashing question mark, reinstall macOS first. A new Mac’s setup assistant includes migration, so you can restore during first setup (Apple Support).
- Connect the Time Machine disk and turn it on.
- On a Mac that’s already set up, open Migration Assistant from Applications > Utilities and enter your administrator password if asked.
- Select the option to transfer from a Mac, Time Machine backup or startup disk, then click Continue.
- Choose the backup disk and then the backup. To use an older backup, click the disclosure arrow next to the one shown.
- Tick the categories to transfer, set or note any account passwords Migration Assistant shows, and click Continue.
Apple warns that large transfers can take hours and may seem to pause. One compatibility rule matters when you move between Macs: a backup made on macOS Monterey 12 or later can only be restored to a Mac running macOS Big Sur 11 or later (Mac User Guide).
Can Time Machine back up to a network drive?
Yes, to another Mac shared as a Time Machine backup destination or to a NAS that supports Time Machine over SMB. Apple recommends Mac-to-Mac network backups only when both Macs run macOS 11 or later. AirPort Time Capsule and AirPort Extreme backups are no longer recommended, because they use Apple Filing Protocol, which isn’t supported in macOS 27 or later (Apple Support).
| Backup destination | Apple’s status | Keep in mind |
|---|---|---|
| External drive (USB-C, Thunderbolt or USB) | Most common setup | Connect it directly, not through a hub |
| Another Mac sharing a folder or drive | Supported; recommended when both run macOS 11 or later | Turn on File Sharing and Share as a Time Machine backup destination |
| NAS that supports Time Machine over SMB | Supported | Follow the NAS maker’s setup guide; AFP isn’t supported in macOS 27 or later |
| AirPort Time Capsule or AirPort Extreme with a drive | No longer recommended | Uses AFP, not supported in macOS 27 or later |
To share a Mac as the destination in macOS Ventura 13 or later, Apple’s steps are: System Settings > General > Sharing, turn on File Sharing, click the info button, add a shared folder, Control-click it, choose Advanced Options and select Share as a Time Machine backup destination. Network backups are only as fast as your network, so Apple suggests a direct connection if speed matters (Apple Support).
How do I exclude folders from Time Machine?
Open System Settings > General > Time Machine, click Options, then click the add button and choose the folders or files to leave out. You can also drag items into the list, and click Done when finished. Apple says excluded items still appear in local snapshots, and that the exclusion list applies to every backup disk if you use more than one (Mac User Guide; Mac User Guide).
Apple’s own reasons to exclude something are saving space on the backup disk and leaving out items you already back up another way. It also points to large, frequently changing files, which Time Machine re-copies each time they change and which make backups slow (Apple Support).
What happens when the Time Machine backup disk is full?
Time Machine deletes the oldest backups to make room, so you lose history, not the latest backup. If it says the disk doesn’t have enough space or is nearly full, Apple’s fix is a backup disk at least twice your Mac’s capacity, or excluding items. Check the Mac’s own startup disk too: if it’s nearly full, Time Machine may not have room for the temporary data a backup needs (Apple Support).
Is Time Machine better than iCloud for backing up a Mac?
They do different jobs, and Apple describes both as ways to protect your files. Time Machine copies all of your files to a drive you own and keeps older and deleted versions. iCloud syncs photos, contacts, notes, iCloud Drive and, if you choose, your Desktop and Documents folders across devices, using your iCloud storage plan. Apple also suggests keeping an extra copy of what’s in iCloud (Apple Support).
Using both is the safer setup: iCloud for access everywhere, Time Machine for a full local history. That’s the 3-2-1 backup rule in practice, and our cloud storage vs cloud backup explainer covers why sync alone isn’t a backup. If iCloud is already out of room, see iCloud storage full. A second Time Machine disk kept at another location also works: Apple says Time Machine rotates between disks and backs up whatever changed since each was last used (Mac User Guide).
Time Machine backup failed or slow: what to check
Start with the connection and the space, then the disk format. Apple’s troubleshooting list, in short (Apple Support; Apple Support):
- Connect the backup disk directly to the Mac, not through a USB hub, and make sure the disk is a supported type.
- Free up space on the Mac’s startup disk and check the backup disk is at least twice your Mac’s capacity.
- If files were unavailable, run a manual backup while the Mac is unlocked; some protected files need that.
- Check VPN or third-party security software, which can interfere with the backup disk; antivirus scans can also keep the disk busy.
- Repair the backup disk in Disk Utility, and check the drive maker for firmware updates.
- On macOS Big Sur 11 or later, an older disk not formatted as APFS can be erased as APFS for better performance. That deletes the existing backups on it.
Erasing removes your backup history
Erasing a backup disk, whether during setup, when switching to encryption on a network disk, or when reformatting as APFS, permanently deletes the backups on it. If that disk holds your only copy of older files, copy them somewhere else before you erase it.
FAQ
Should I encrypt my Time Machine backup?
Encryption helps protect the backup from unauthorized access if the drive is lost or stolen, and you turn it on during setup. Keep the password safe: Apple says you’ll need it to restore files from that backup.
Can I use Time Machine on a MacBook Air or Mac mini?
Yes. Time Machine is built into macOS, so the setup is the same on any Mac; only the port you plug the drive into differs. Apple’s drive-size rule still uses your Mac’s own storage capacity.
Can Time Machine back up to iCloud?
Not according to Apple’s list of backup disks. It covers external drives, another Mac on your network, SMB network storage and older AirPort devices. iCloud is a separate sync and storage service.
Can I back up a Mac without Time Machine?
Yes. Apple lists dragging files to an external drive by hand, syncing with iCloud, and third-party backup utilities from the App Store or other sources. Time Machine is the Mac’s built-in backup feature.
Can I unplug the drive during a backup?
Eject the disk or shut down the Mac before you disconnect it. Time Machine resumes its schedule automatically when the drive is plugged back in.
How this article was made. We drafted this article with the help of AI tools, working from the official pages listed in Sources. Facts and steps were checked against those pages on November 10, 2026. Fawad Malik is the credited author; the BravoTech team prepared it under our editorial standards. We did not test these products hands-on for this article. Spot an error? Email [email protected].
Sources
11 official Apple pages, each opened on November 10, 2026 (PKT). Steps follow macOS Ventura 13 or later; Apple links earlier-version steps from the same articles.
Show all 11 sources
- Apple Support: Back up your Mac with Time Machine
- Apple Support: Backup disks you can use with Time Machine
- Mac User Guide: Choose a backup disk and set encryption options on Mac
- Mac User Guide: Back up your files with Time Machine on Mac
- Mac User Guide: Exclude files from a Time Machine backup on Mac
- Mac User Guide: Use Time Machine on your Mac to back up to multiple disks
- Mac User Guide: Restore items backed up with Time Machine on Mac
- Apple Support: Restore your Mac from a backup
- Apple Support: If you can’t back up or restore your Mac using Time Machine
- Apple Support: If Time Machine takes a long time to back up
- Apple Support: How to back up your Mac
Changelog
- November 12, 2026: First published. Time Machine setup, drive-size table, what is and isn’t backed up, restore with Time Machine and Migration Assistant, network destinations and troubleshooting, checked against Apple’s pages on November 10, 2026.
Related reads